How to solve picross puzzles like a pro
So you wisely picked up Hatsune Miku Logic Paint S, expecting some delightful Vocaloid music and cute artwork, but you’ve discovered you actually have no idea how to solve picross puzzles. Oh no!
Never fear, puzzling Padawan, we all have to start somewhere. Our picross puzzling guide will give you all the core strategies you need to solve pretty much any picross puzzle you might be confronted with, regardless of its size!
Important things to remember
- Picross puzzles are always entirely logical. There is no guesswork involved.
- The numbers in a row or column of a picross puzzle indicate the arrangement of filled-in cells. There must be a gap of at least one cell between each group. Get in the habit of marking the minimum size of those gaps with crosses.
- The most important thing when solving a picross puzzle is to find a good place to start, and everything else will tend to stem from there.
- If you think you know what the picture in a picross puzzle is before you’ve solved it fully, don’t make assumptions. There might be some cruel little surprises in there!
- If the total of the numbers in a row or column plus the number of numbers minus 1 equals the width or height of the picross puzzle, there’s only one possible arrangement of cells in that row or column.
- If a row or column has a single number the same size as the puzzle, fill that whole sucka in right away!
- For single large numbers in a picross puzzle, count in that number from both sides to find cells that must be taken. Then fill in the space between them.
- It’s pronounced “pick-ross”, not “pie-cross”. This is because it stems from the words “picture” and “crossword”.
A practical walkthrough
We’re going to take a 10×10 picross puzzle from Hatsune Miku Logic Paint S as a practical example of what you should do to solve one of these puzzles. Let’s go!
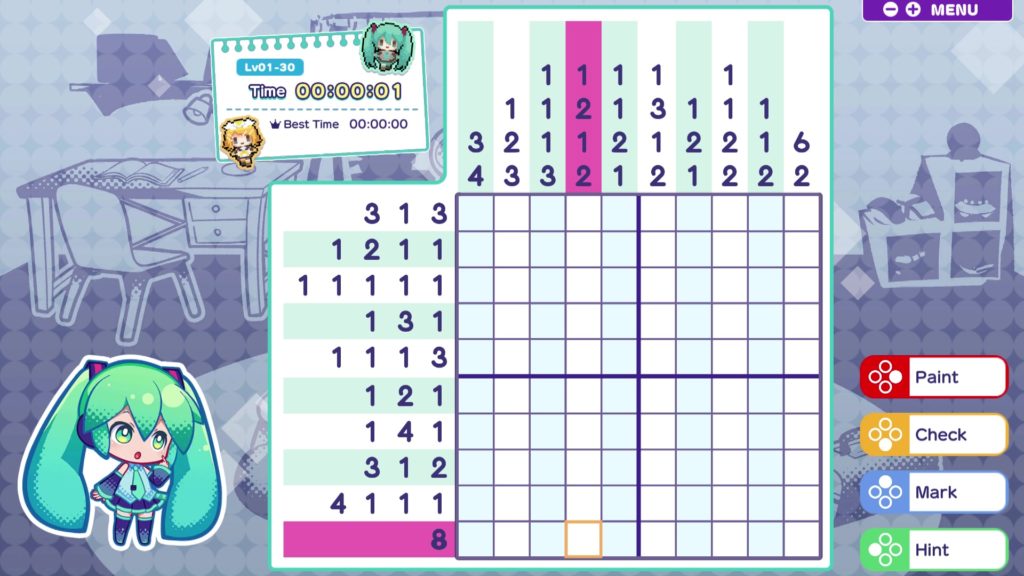
Here’s your starting point. The first thing to do is to find a good place to start filling in cells. This isn’t always immediately obvious, particularly as the puzzles get more difficult. A good rule of thumb is to look for a line that has a single, large number on it, such as the “8” on the bottom row here.
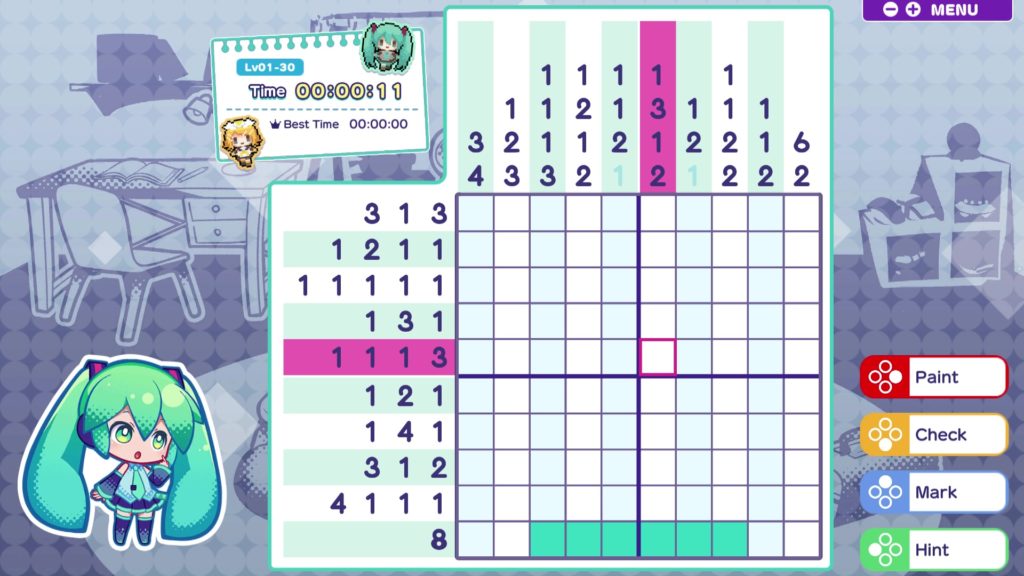
We can’t fill in the whole row yet, but given the row is 10 cells long, we can fill in the cells that must be taken regardless of where the extremities are and how the 8 is positioned in the row. To figure these out, start from the leftmost cell and count 8 along to the right, then mark that cell. Then start from the rightmost cell and count 8 along to the left, then mark that cell. Then fill in all the cells between those two points you marked.
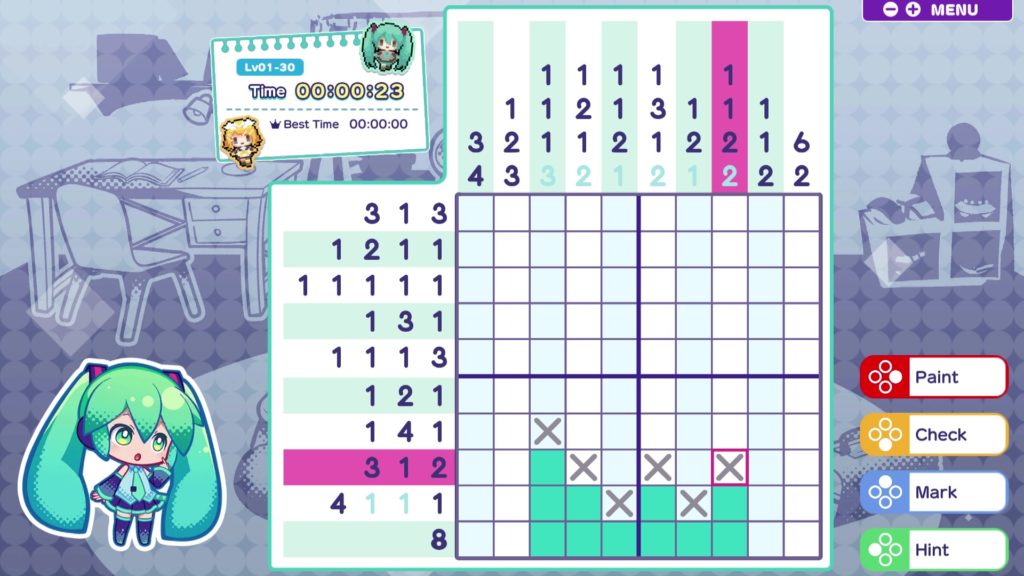
Next look up at the numbers in the columns. Extend the cells we’ve already filled in up to the height indicated in the last number of the column. We know this is correct because there’s only one possible direction those columns can grow. When you’re done, mark a “cross” next to each one, because we know there can’t possibly be a filled-in space there.
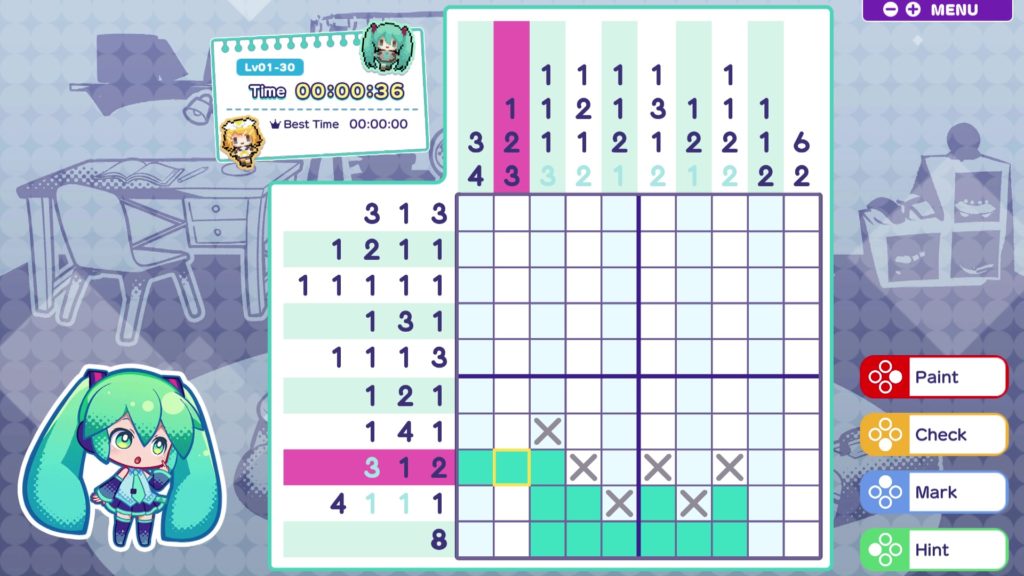
We can already see some other cells we can fill in as a result of this. This row of 3, for example, can only go here because there’s no space for it anywhere else.
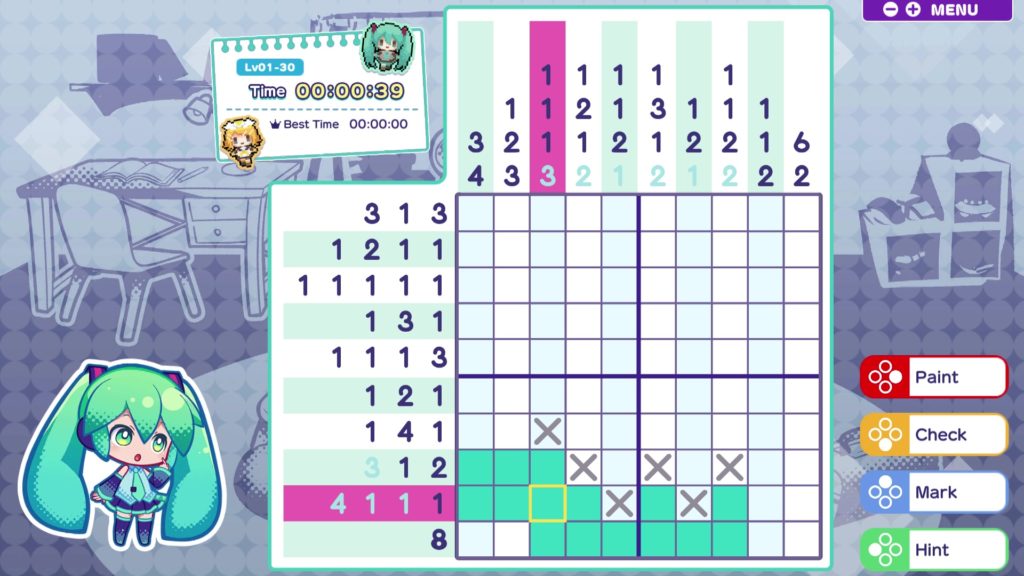
And the same for this row of 4. Learn to spot things like this — these are the key to quickly filling in a whole bunch of the grid. But remember, there’s no guesswork — if you’re not 100% sure a cell should be filled in, don’t fill it in! In Hatsune Miku Logic Paint S and many other picross games, you can always press the X button to do a tentative “mark” without committing to painting a cell if you want to.
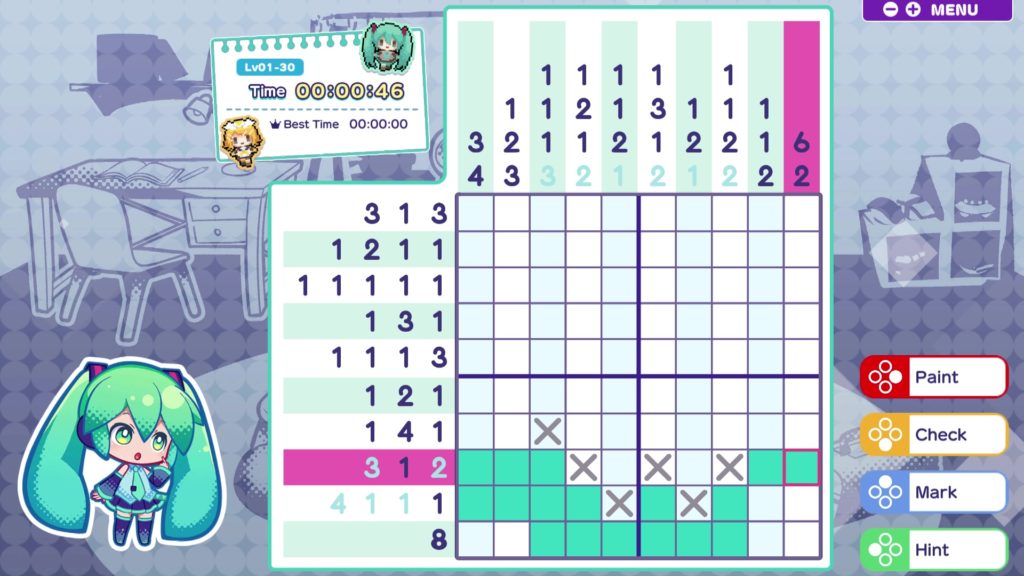
This row of 2 over on the right is another one that can’t possibly go anywhere else, because there are no other sets of 2 cells together on the row. Fill it in with confidence!
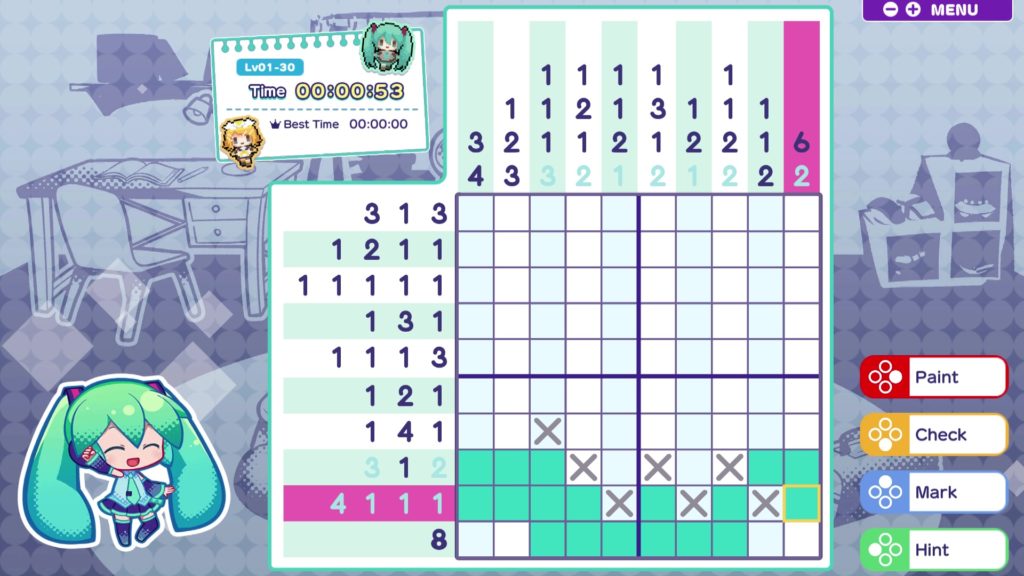
Here’s another one we can figure out with some logical deduction. We know that the last 1 on this row must go in the last column, because it can’t go next to another cell on this row. Conveniently, that also fills out the 2 in the last column, too. It’s all coming together!
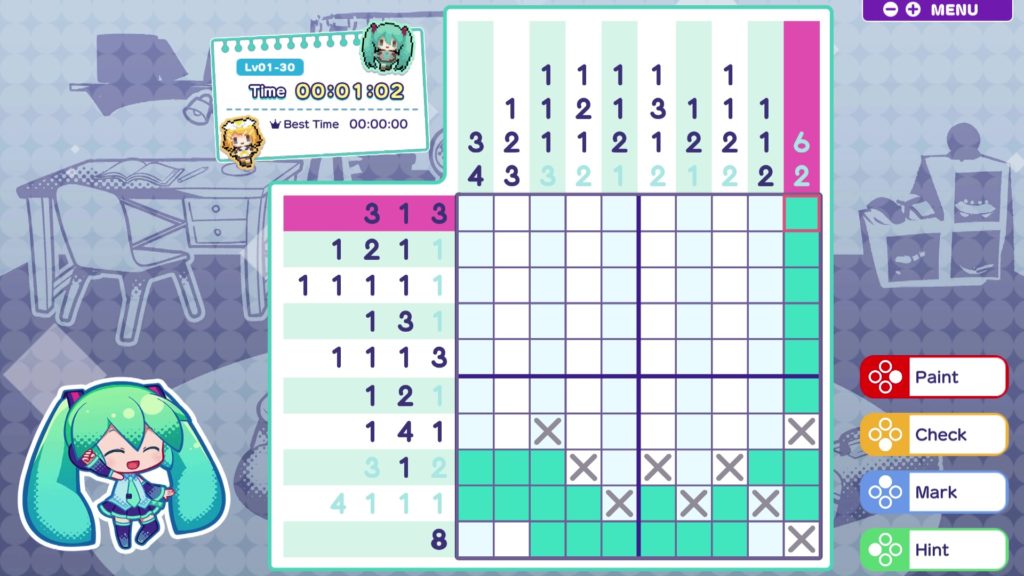
And if that 2 in the last column goes there, the 6 must go here, because there’s nowhere else it can possibly go. Yeah boi, we flyin’ now. Look how happy Miku is with your mad picross skills.
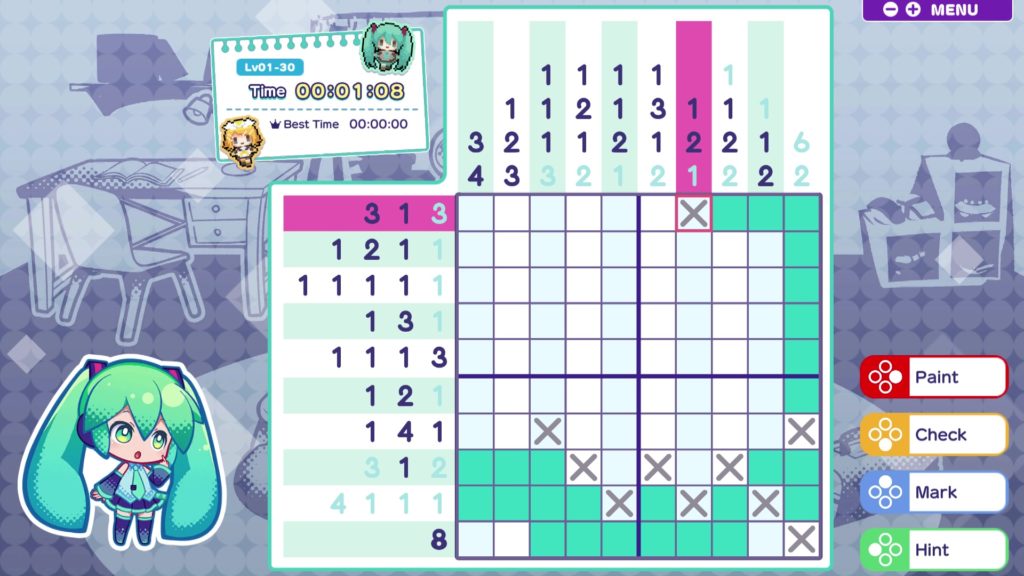
Once again, because we’ve successfully taken a cell on the edge, we can extend that out to match the other numbers. In this case, we can extend the top row out to 3 cells in from the right edge.
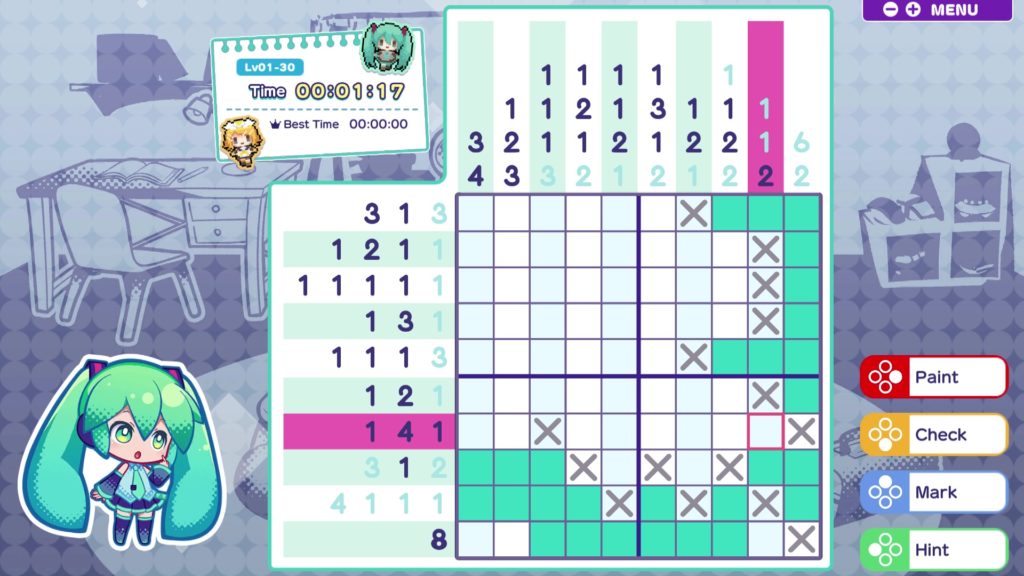
And as before, we can work our way down the column and figure out some more. We know that all the 1s must have a cross by them, and we can extend that 3 our down on the fifth row. The seventh row is where we need to be a bit more careful, though, because we don’t necessarily know where that 1 is. And you know what they say about assuming — it makes an ass out of you and Ming the Merciless. (I don’t think that’s right – Ed.)
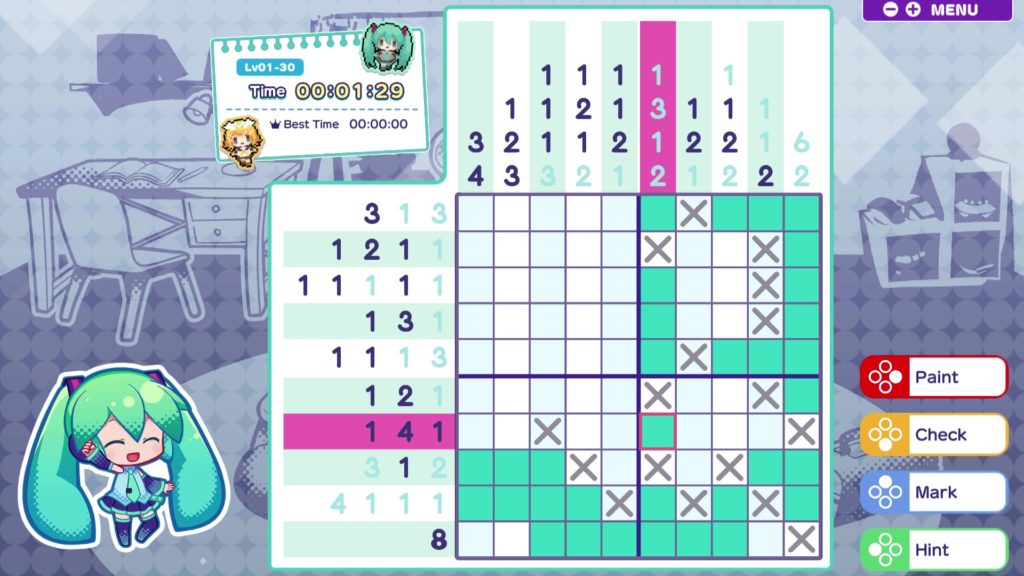
Instead, zip over to this column and fill it in, because there’s only one possible arrangement of those numbers in a 10×10 grid. This means we could have used this column as a starting point, too.
To spot rows or columns that only have one possible arrangement, add up all the numbers in the column, then add another 1 for each pair of numbers. If the total is the width or height of the puzzle, there’s only one possible arrangement. In this case, 1+3+1+2=7, then another 1 for 1+3 gives us 8, another 1 for 3+1 gives us 9, and a final 1 for 1+2 gives us 10. Therefore the arrangement must be O X OOO X O X OO. Maths! Kind of.
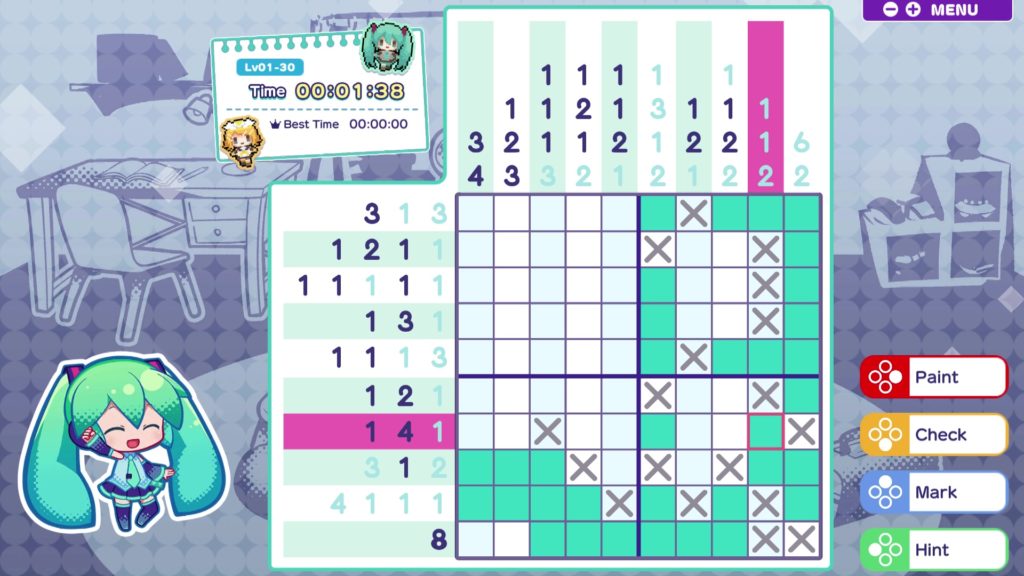
With the gaps we’ve created and the cells we’ve filled, there are a few other places where there’s only one possible place that can be filled in — this 2 in the penultimate column is a good one, and it also confirms that the 1 on the seventh row is indeed in that cell, too. See? No guesswork required.
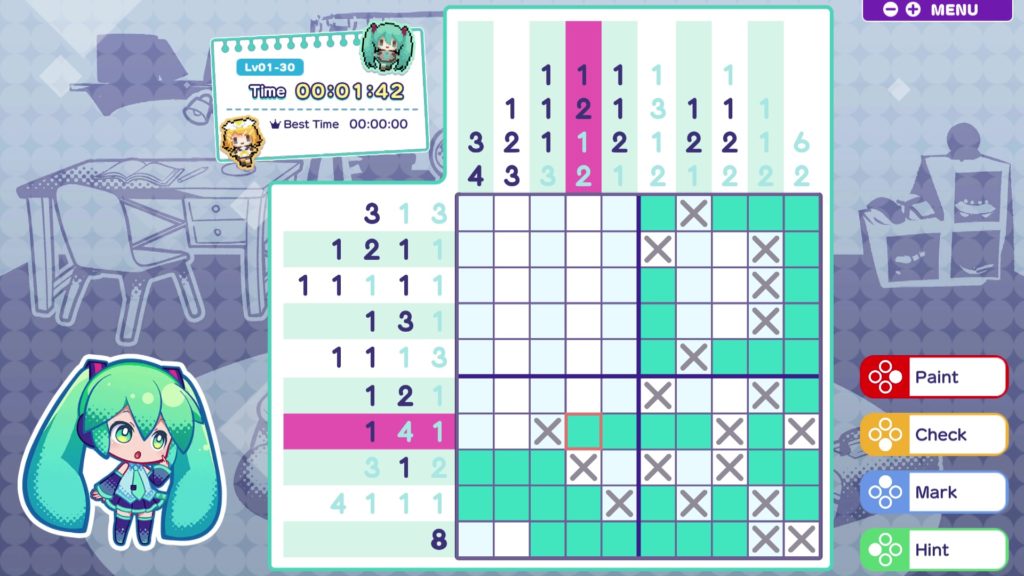
And if there’s a 1 there, that means there’s only one possible place the 4 can go on that row, too.
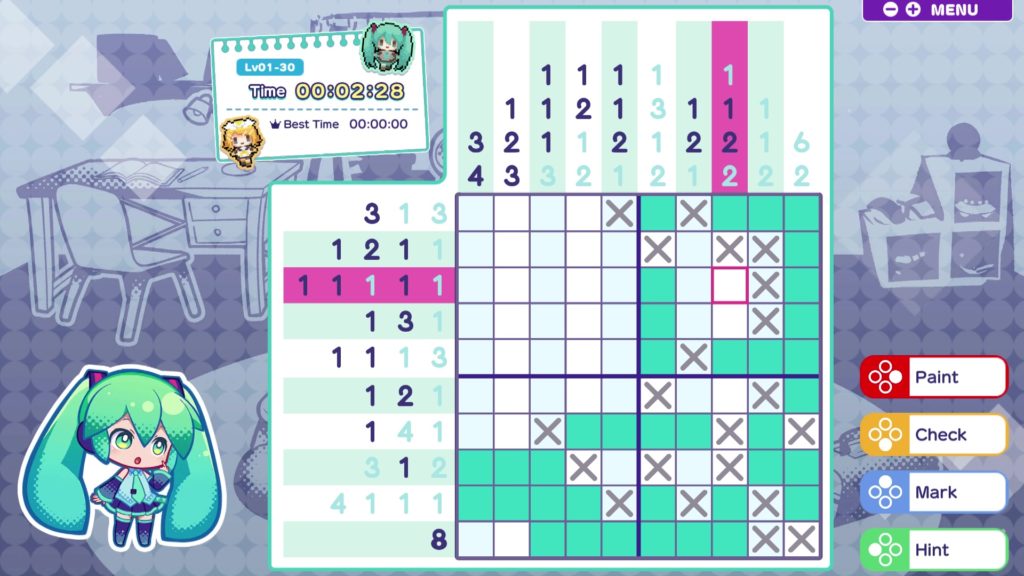
Hmm, now what? If you feel like you’re getting “stuck” at any point, go around any of the groups of cells you’ve already solved and make sure you’ve marked crosses next to all of them. Sometimes making that simple mark can make things a lot clearer.
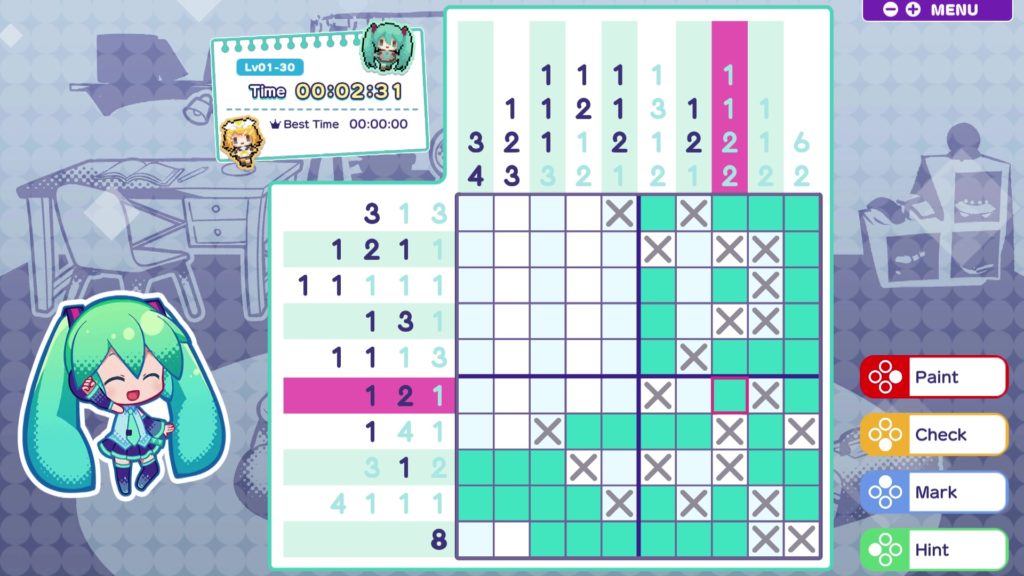
For example, just a couple of crosses up top lets us spot that there’s only one possible way we can fill in this column.
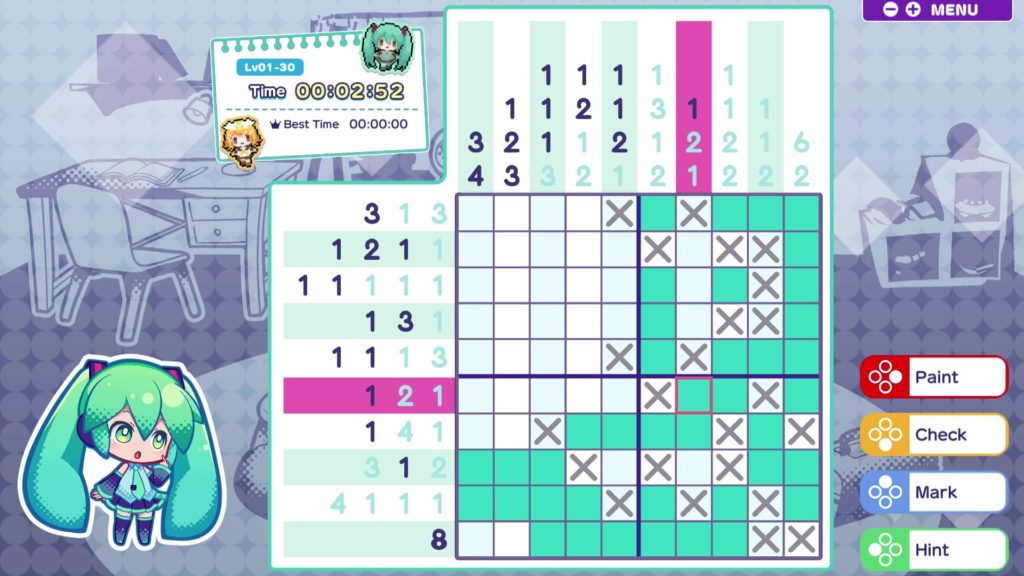
We’re getting into fiddly fine details now, but the logic remains the same: if there’s only one possible place you can fill in a cell, it must be there. In this case, we’d already filled in half of a 2, so the other one must be in the adjacent cell.
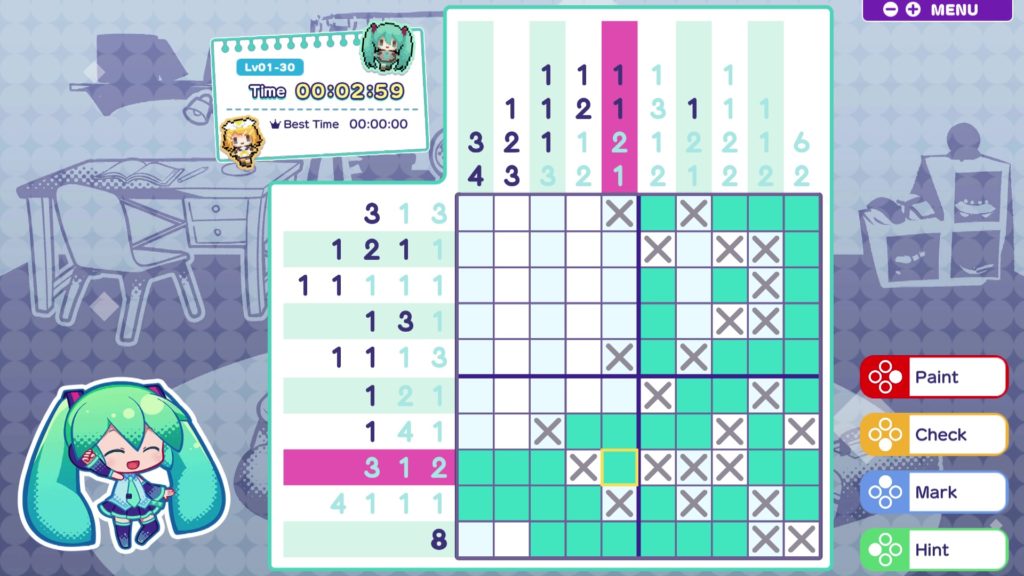
Keep filling in crosses as you go, because doing so will often make it clear where some other correct cells are. You don’t have to mark crosses to solve the puzzle — filling in a row or column correctly will add them for you — but it can be very helpful to do so. Here, for example, we’ve worked out the only possible place the 2 can go in this column is here.
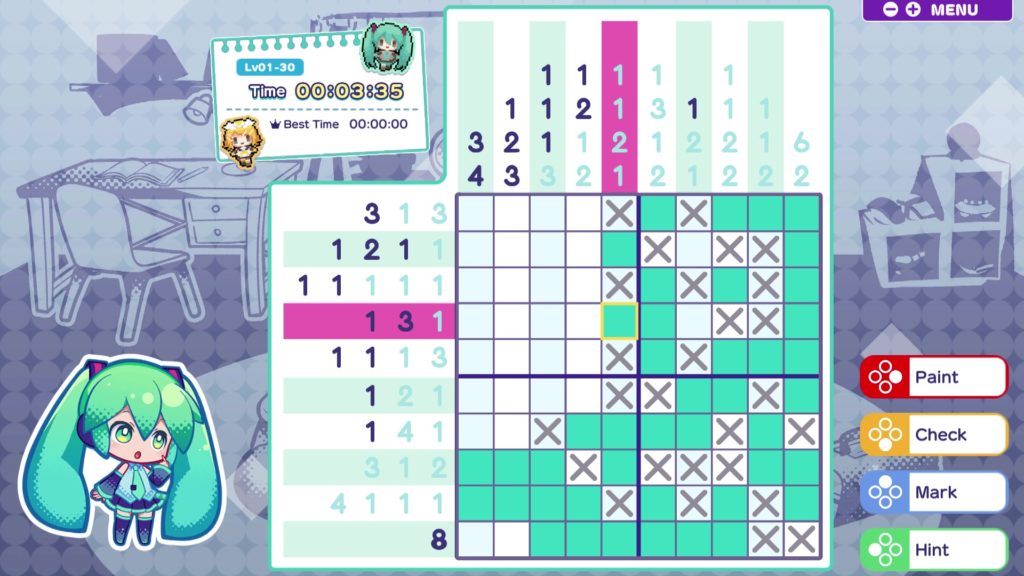
Likewise, keep plopping crosses down in cells you know can’t contain anything — because they’re next to completed groups — and you’ll eventually be left with only a single possible place to fill in cells. Here we’ve filled another column by doing just that.
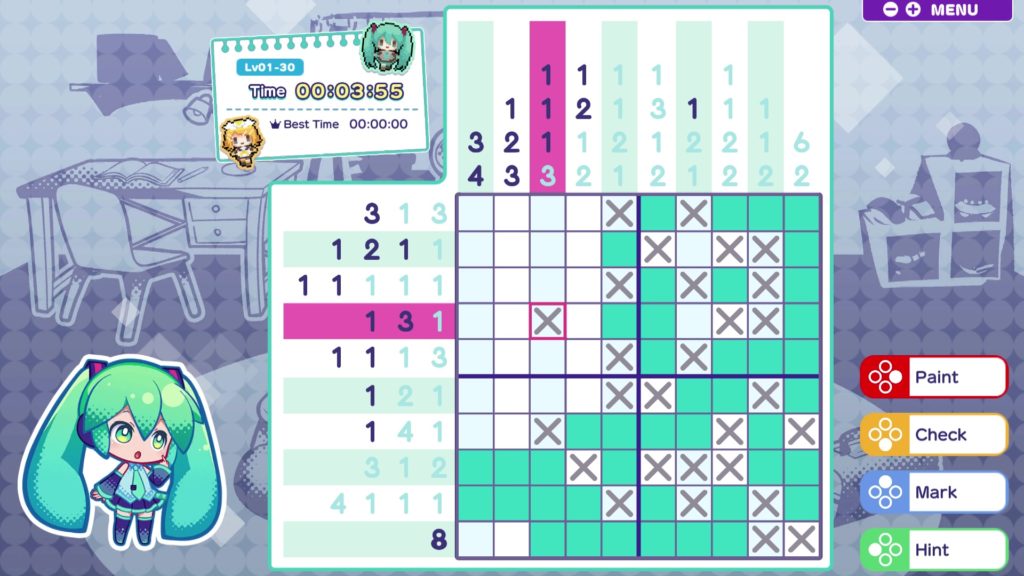
Another useful strategy is plopping down a cross at the outer extremity of a possibility. On this row, for example, we don’t know exactly where the 3 is, though we know that those two cells we already have are correct. The last cell can be in one of two places, so make sure there’s a cross marked in the cell adjacent to both of those, because regardless of what the right answer is, there can’t be anything in that cell.
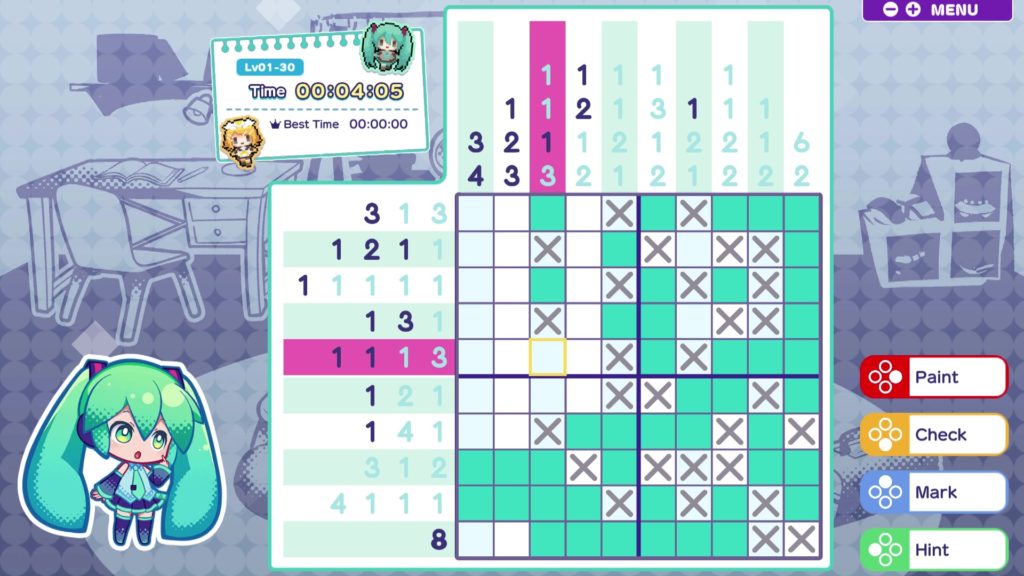
Again, just plopping a single cross down can help you work out some other things. That cross we just added leaves only one possible arrangement of the first two 1s in this column. The third 1 can go in one of two places, though, so we leave that one for the moment until we have a definitive answer.
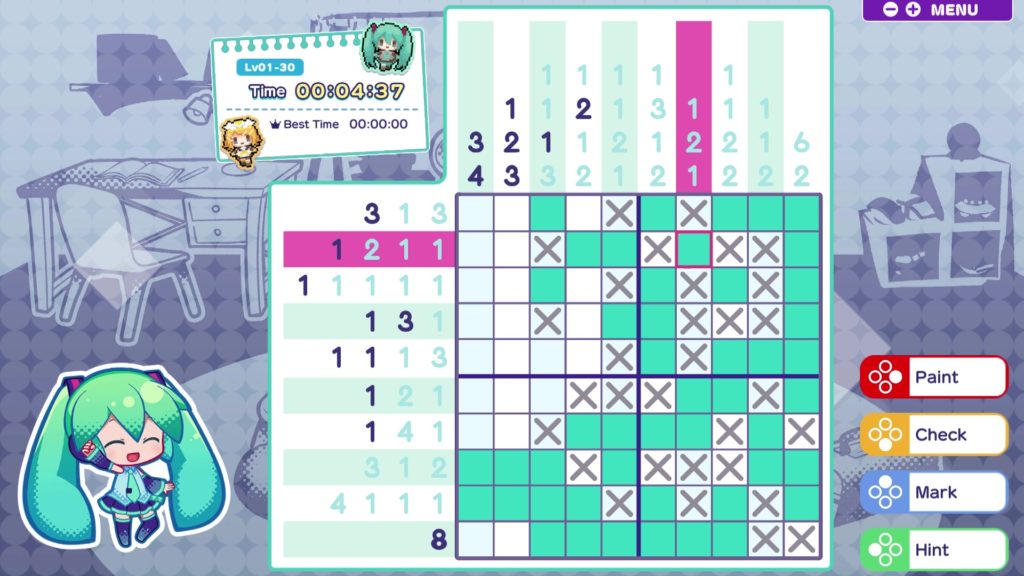
By this point in a puzzle, filling in the gaps in a bunch of places should be getting easier and easier. Remember, though, never guess — only fill in cells you know are correct.
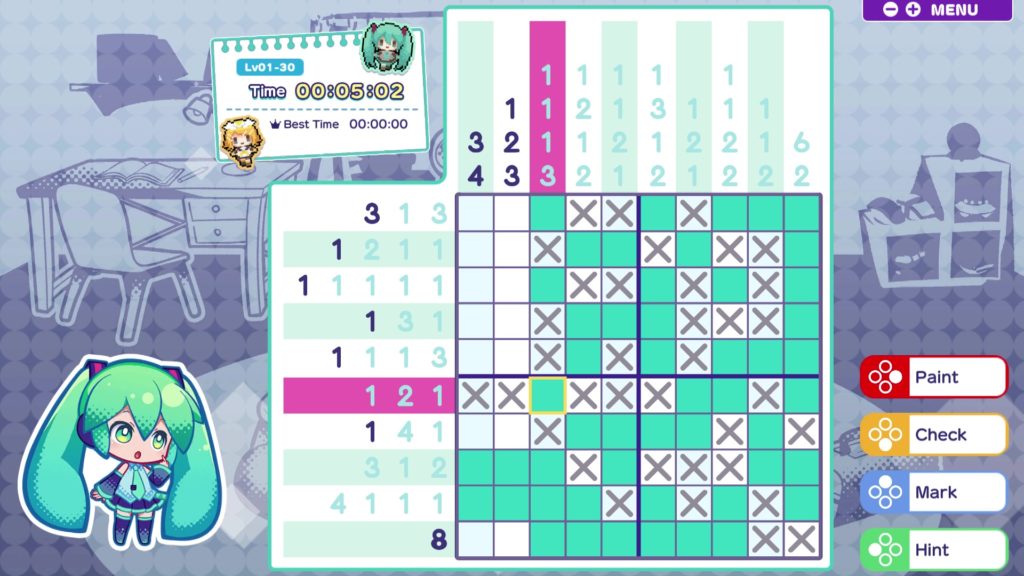
Keep filling in the gaps. You’ll likely find at this point that each gap you fill in makes the solution to yet another row or column completely obvious, so keep tugging at that thread as long as possible.
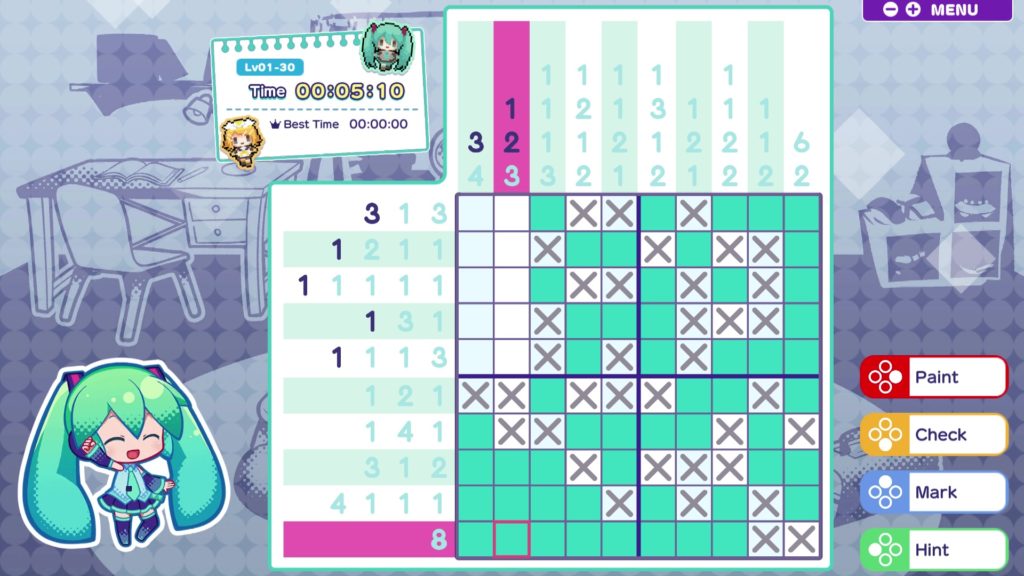
Here we’ve finally filled out that 8 row we started with. The astute will have noticed we could have probably done this a lot sooner, but when combined with the 4 in the first column and the 3 in the second, it just confirms things beyond all doubt.
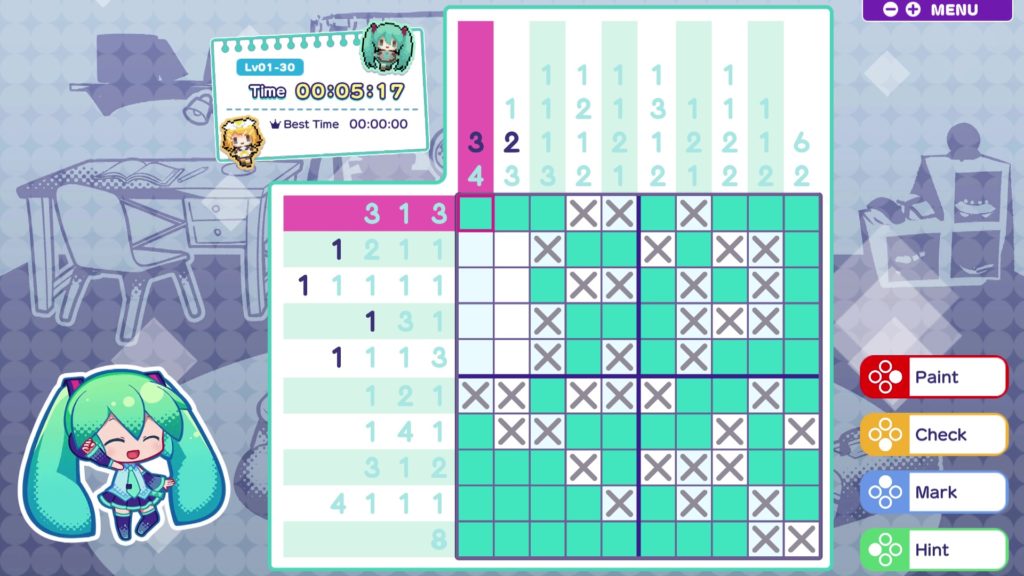
Now time to polish things off! We fill in the 3 on the top row because, as usual, there’s only one possible place it can go…
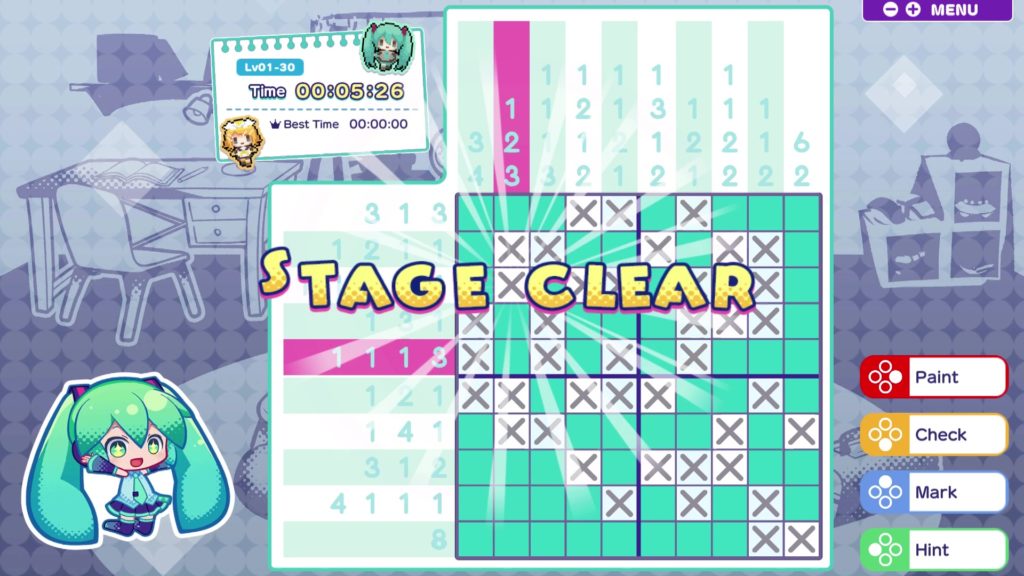
…and from there the rest should be obvious! Congratulations, you did it!
Hatsune Miku Logic Paint S is available now for Nintendo Switch.
Join The Discussion
Rice Digital Discord
Rice Digital Twitter
Rice Digital Facebook
Or write us a letter for the Rice Digital Friday Letters Page by clicking here!
Disclosure: Some links in this article may be affiliate links, which means we may earn a small commission if you make a purchase after clicking on them. This is at no additional cost to you and helps support Rice Digital!
- Letter from the Editor: passing the torch - June 30, 2023
- Super Woden GP 2 is looking promising - June 30, 2023
- Inti Creates is making a 32 bit-style Love Live action platformer - June 26, 2023


